Custom Editor - Unity
- Loki Sanguine
- Feb 22, 2023
- 5 min read
Updated: Mar 14, 2023
Abstract
Custom Editors are a powerful tool that you can implement as a programmer to make sure other people have an easier time accessing what you have made. The added effort to make these you'll find great value in more as things become complex but the given code and project writeup given here should be a strong starting point. My information for putting this together comes from this document from Unity. If you want an example of another place this is used, I implemented these when working on All Eyes On Me to make modular skill behaviors. The writeup for that project more generally is here. With a link to the Github to follow along here. Please note the project is originally written in 2020.2.7f1though upgrading versions shouldn't lead to issues with the code as written.
What is a Custom Editor?
A Custom Editor is well... exactly that. A customized window to edit information of a script in Unity. This can include range sliders, data validation to make sure relevant data is easier to plug in. General optimization to the designing pipeline for systems can be made in here. For the example here I will be firing a projectile out of a rigid setup into a wall. Our helpers constructed ahead of time giving a different behavior to our projectile to sort of simulate this base projectile being made into different abilities.
Why make a tool for this you may find yourself asking. Well, when you are working with many moving parts using a tool to make it so you only need to plug and play saves many headaches. Your code will be seen, used, and toyed with by many. So making the tool gives the most proper accessibility to what you have crafted. This also gives you another level of explaining the importance of different pieces yourself or a designer will want to play with. So the tool can serve as another level of documentation to track where things may have gone wrong.
Guided for our project
In the project I have provided on startup you should have a window that looks like the following:
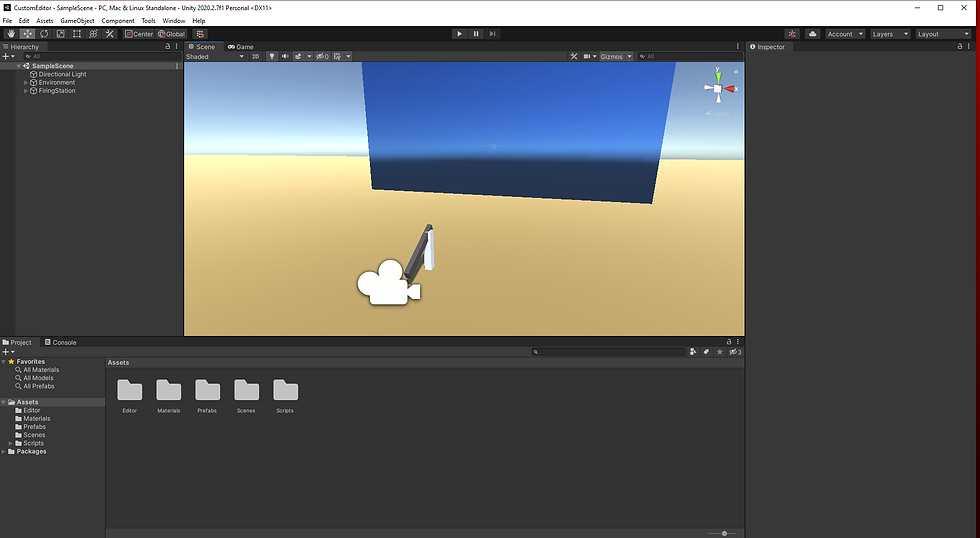
Pulling things apart we have a few things in our sample scene. A directional light, Environment, and FiringStation object. For our demonstration we only need to worry about the FiringStation object itself, then in our content browser, our Prefabs and Editor folder. As it stands the default way this project runs is the following:

Every time we hit enter we get to spawn a Shot moving in a direction at Some Speed. In our base code I didn't offer much customizability other then this speed variable as I can cover more shooting mechanics and expand this project at a later point. For each shot there is a different behavior depending on shot type. So in the ShotBehavior script we have the following.

As we can see, nothing ground breaking. However the public enum of SomeType is important. Managing this is how we attach helper behaviors of those types to our shot. For simplicity those scripts are accessible in the content browser from Assets >> Scripts >> Shot_Helpers. You may play with and add update behaviors on your own as you see fit. For now let's talk about the tool used to attach these to our prefab of shot.
Custom Editor - Startup
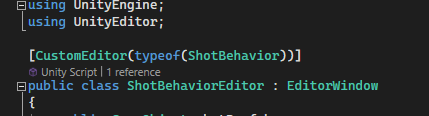
Under our Editor folder we have a single script. The ShotBehaviorEditor script. Things will get a bit tricky to explain but if you follow along from top to bottom we'll explain as we go.
The first elephant in the room in setting this up, we need to use the UnityEditor package. From there the line [CustomEditor(typeof(ShotBehavior))] lets Unity know what component this editor is for. Then we need to have our class inherit from EditorWindow so we can make our own window for this. I can discuss in another posting using inheriting from Editor instead but I prefer EditorWindow for as we get onto more complicated things making our own display window feels much cleaner. Editor is for when we change something in the Inspector display EditorWindow for our own dedicated window being made.
After this we set out path for this to be opened as Tools/ShotBehaviorEditor and use the function GetWindow which is called when we open the tab in scene. So in code that looks like the following:

So in the scene we can have this:

Great, we have the ability to display a window. As you may see from that snippit we have some other work going on below. There are many ways of structuring our code you can go with, I will simply be guiding you with my preferred style to not overload my brain as I work through this problem. OnGUI() can be thought of as our Update function for when our window is open. So let's dig into how our initial display is made.

In our OnGUI function we first make the label for distinguishing it. I went with "Shot Behavior Easy Editor" to drive this home and a boldLabel EditorStyle argument makes it stand out. Now the ObjectField is a little hard to read for the first time so let's look at visually what we are doing.

Much like in the inspector when you want to add a GameObject, or any component attachment argument, we cast ab ObjectField in our EditorGUILayout to set this. On the far end of this bar we even have the usual dropdown menu for the dropdown field to search for it's own viable target. In our if else statement we check that our shotPrefab variable has been set and that it has a ShotBehavior component. If both of these are true we continue to LoadComponent() for filling out further information. Otherwise we add the ShotBehavior component first.
CustomEditor - Loading Information
There is a plethora of information you can have loaded this way. For our example I kept the behavior very basic. Whenever we move onto another section of information I try to make sure to inject a space into our Editor to add a bit more readability to designers as they tab through. In our LoadComponent() function we are going to make a dropdown menu for the SomeType enum made in ShotBehavior. Then interpreting that enum to change our prefab. This is done with an if statement because I believe it's easier to visualize this to someone newer to the concept. You may use a switch break implementation if you like, in any case we do the following.
Destroy other components if they are present.
Add our component if it isn't present.
Then call our loading information function for the present helper script.
As each if statement calls the same information I will just show off one of them with the note the only difference in any of them is the names of functions called.

So why do we use DestroyImmediate? Well if you use the other destroy functions it simply doesn't work while we are in editor still. In the ediot though this behavior looks like the following:

In our EditBounce(), EditDestroy(), and EditStick() functions I made a few different ways for you to play with of getting this information. Whenever possible I highly recommend sticking with someValue = EditorGUILayout.Slider() which to work properly in our Slider() function you need to pass in your variable (someValue in this case), a minimum, and a maximum value. If you have any questions please feel free to send them my way. Have fun, be creative, and please have a lovely rest of your day wherever in the world you may be finding yourself.


Comments